Enyo Apps on Windows 10
In this article, we present instructions for developers wishing to deploy Enyo applications to PCs, tablets, and phones running Windows 10, via the Windows Store.
Before You Begin
In order to build and test your Enyo application for Windows 10, you will first need the following:
- Enyo 2.7 or later
- A PC running Windows 10 (and, optionally, a tablet or phone running Windows 10)
- Visual Studio 2015 (Community, Professional, or Enterprise edition) or Visual Studio Express 2015 for Windows 10
Building and Testing
1. Create Your Enyo Application
Build your Enyo application as described here.
2. Create a New Visual Studio Project
Open Visual Studio and select File > New > Project. The New Project window will open.
Expand the left pane to Installed > Templates > Javascript > Windows > Universal. The center pane will display a list of Universal Windows Platform (UWP) apps.

Select the Blank App (Universal Windows) Javascript template from the center pane. This template will create a minimal UWP app that compiles and deploys, but contains no data or front-end controls.
In the Name field, enter your project's name. For this tutorial, we'll enter the name
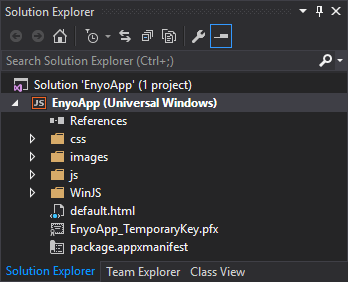
EnyoApp.Click OK to create the project. Visual Studio will create your project and display it in the Solution Explorer.
Copy your Enyo app's
distdirectory into your Visual Studio project structure. Make sure that your enyo application files are included in the project by activating the Show All Files option of the Solution Explorer, then right-clicking on yourdistfolder, and selecting the Include in Project contextual menu item.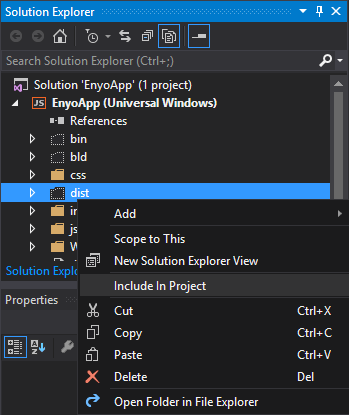
Your project structure was built with your main page named
default.html. Change the name of this file todist/index.htmlto match your Enyo application. In the Solution Explorer on the right-hand side of the screen, double-click thepackage.appxmanifestfile to open it. You will see a field labeled Start Page. Update this field value to match yourdist/index.htmlstarting page.Your project will include
css,js, andWinJSfolders by default. Feel free to delete these from the project.
3. Build and Deploy Your Project Locally
In Visual Studio, select Debug > Start Debugging to build and debug your project on your local PC.
4. Build and Deploy Your Project on a Remote Device (Surface or PC)
First, install Remote Tools for Visual Studio 2012 on your Microsoft Surface.
On the remote device, open a browser instance and navigate to http://www.microsoft.com/visualstudio/eng/downloads#d-additional-software.
Select the item Tools for Visual Studio 2015. A menu will display a list of Visual Studio Tools.
Download and install the Remote Tools for Visual Studio 2015 Update 1.
Then, launch and configure the debugger that you just installed.
On your remote device, open the Remote Debugger application. (Note that it will open in the PC environment.)
Select Tools > Options.
Select No Authentication and ensure that Allow any user to debug is checked. (You may need to set authentication based on your network situation.)
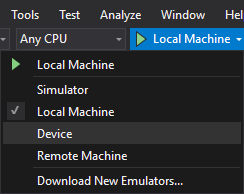
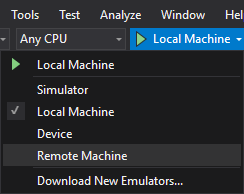
Make sure that your computer and your Surface are on the same network. In Visual Studio, select Remote Machine as your debug/build target.
Once Remote Machine is selected, you should be able to locate your Surface on the network.
4. Build and Deploy Your Project on a Windows 10 Mobile Device
Connect your Windows 10 Mobile device to your computer via USB. In Visual Studio, select Device as your debug/build target.